This script help for finding email flow latency between the servers.
This will be most useful when you have the exchange servers across the
site and perform the mail flow routing.
It works on getting
the local server name as source server name and queries each target
mailbox servers which is denoted in the array.
$filePath = "C:\temp\Raji\output.txt"
$array = @("MBX1.mail.com","MBX2.mail.com ","MBX3.mail.com ","MBX4.ad.aricent.co.mail.com")
$SourceServer = $env:COMPUTERNAME
ForEach ($TargetServer in $array)
{
Write-host Testing Mailflow from $SourceServer to $TargetServer -foregroundcolor cyan
Add-Content $filePath "Testing Mailflow from $SourceServer to $TargetServer"
$Output = Test-Mailflow -SourceMailboxServer $SourceServer -TargetMailboxServer $TargetServer | FT -Autosize
Write-Output $Output
$Output | Out-File -filePath $filePath -append -encoding ASCII
}
Just change the File path in the Email Flow Script and you can get the output as out.txt file
Thursday, April 24, 2014
Tuesday, April 22, 2014
Exchange Server SP1 Upgradation – Things to be considered
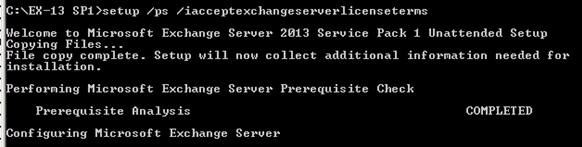
- Don’t execute the setpup.exe /prepareschema /iacceptexchangeserverlicenseterms of Exchange Server 2013 SP1 in the Windows PowerShell. Instead open the command prompt and execute it.
Reason:
when you execute in windows PowerShell it will load the CU3 setup.exe
but when you execute in Command prompt it loads SP1. Find the screenshot
as follow.
Setup.exe in Command Prompt: Check the Banner ((It shows SP1)
Setup.exe in Windows Powershell: Check the Banner :) (It shows CU3)
- Always use Run-As Administrator on the setup.exe when you try to install them in the GUI mode or else you will overcome some error message on access privilege on running the Exchange 2013 Setup
Sunday, April 20, 2014
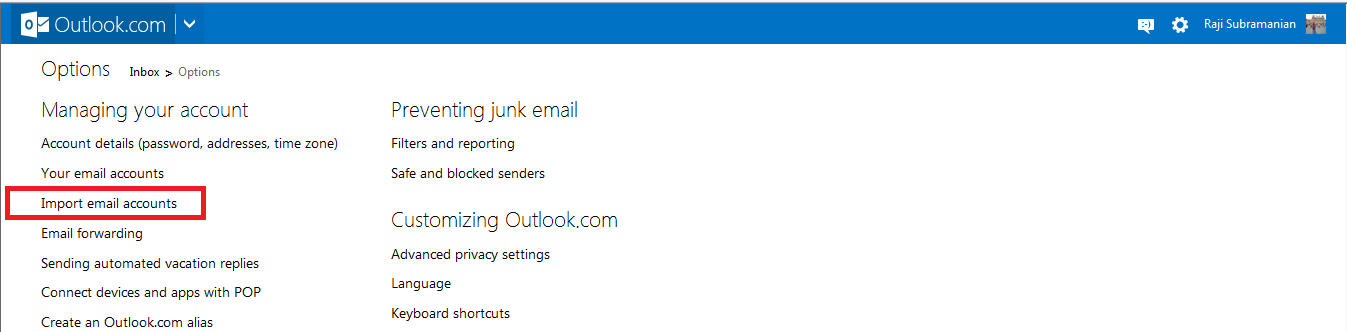
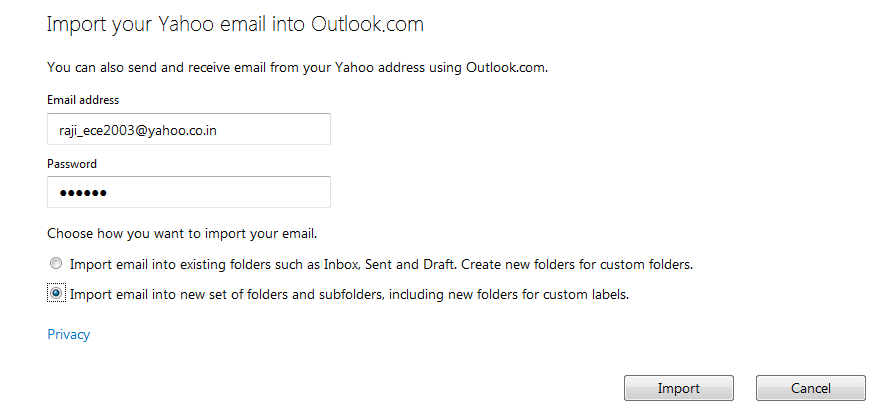
Step by Step: Export Yahoo Email to Hotmail Account
The below article explains the step by step detail on how to export the Yahoo emails to the Hotmail \Outlook.com Account.


Now checkout the Hotmail account and you see new folder holding all the yahoo email. If you want all the upcoming emails to moved to hotmail then configure forwarders
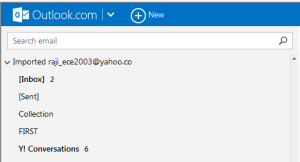
Now you have single console having both the Outlook.com and Yahoo email..:)
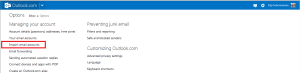
- Login to the Hotmail account – Click Options

- Select Import Email Accounts tab
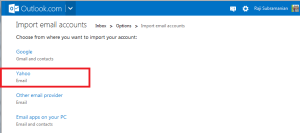
- Select the Yahoo account

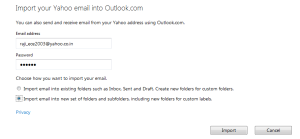
- Enter your yahoo email address and the password. Select the appropriate option you need for importing your emails
Now checkout the Hotmail account and you see new folder holding all the yahoo email. If you want all the upcoming emails to moved to hotmail then configure forwarders

Now you have single console having both the Outlook.com and Yahoo email..:)
Friday, April 11, 2014
Send-MailMessage : Mailbox unavailable. The server response was: 5.7.1 Unable to relay
You may receive the below error message when you try to execute PowerShell script to trigger email

Send-MailMessage : Mailbox unavailable. The server response was: 5.7.1 Unable to relay
At C:\Temp\Get-ExchangeEnvironmentReport.ps1:1096 char:2
+ Send-MailMessage -Attachments $HTMLReport -To $MailTo -From $MailFrom -Subject ..
~~~~~~~~~~~~~~~~~~~~~~~~~~~~~~~~~~~~~~~~~~~~~~~~~~~~~~~~~~~~~~~~~~~~~~~~~~~~~
+ CategoryInfo : InvalidOperation: (System.Net.Mail.SmtpClient:SmtpClient) [Send-MailMessage], SmtpFailed RecipientException
+ FullyQualifiedErrorId : SmtpException,Microsoft.PowerShell.Commands.SendMailMessage
To fix it out follow the below solution
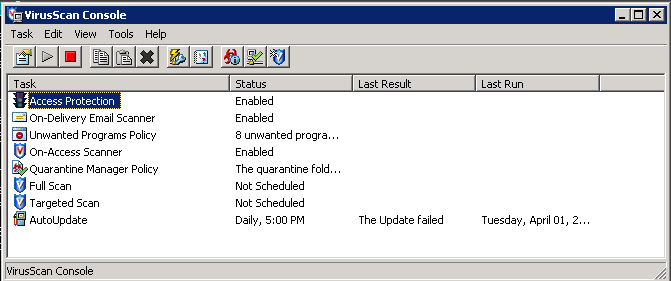
Right click on McAfee icon

Click on Virus Scan Console
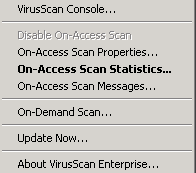
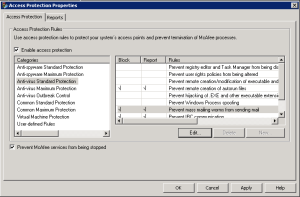
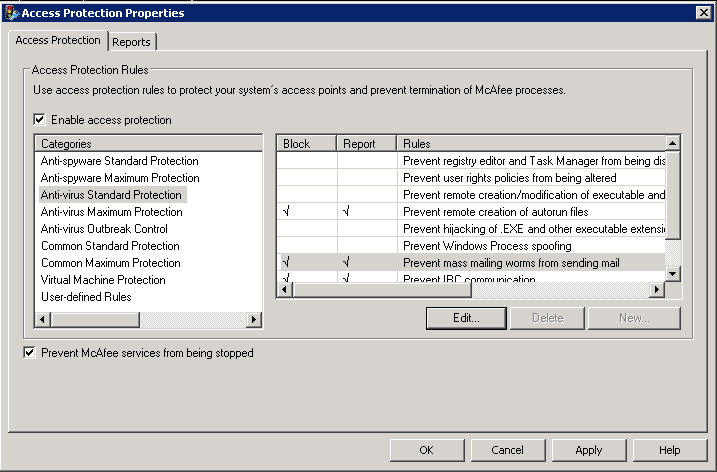
Double click on Access Protection on VirusScan Console - On Access Protection tab

Go to Anti-Virus Standard Protection - On right hand side, double click on Prevent mass mailing
worms from sending mail
On process to exclude tab, add PowerShell.exe at the end
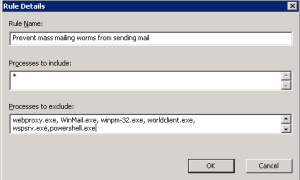
Click ok

Send-MailMessage : Mailbox unavailable. The server response was: 5.7.1 Unable to relay
At C:\Temp\Get-ExchangeEnvironmentReport.ps1:1096 char:2
+ Send-MailMessage -Attachments $HTMLReport -To $MailTo -From $MailFrom -Subject ..
~~~~~~~~~~~~~~~~~~~~~~~~~~~~~~~~~~~~~~~~~~~~~~~~~~~~~~~~~~~~~~~~~~~~~~~~~~~~~
+ CategoryInfo : InvalidOperation: (System.Net.Mail.SmtpClient:SmtpClient) [Send-MailMessage], SmtpFailed RecipientException
+ FullyQualifiedErrorId : SmtpException,Microsoft.PowerShell.Commands.SendMailMessage
To fix it out follow the below solution
Right click on McAfee icon

Click on Virus Scan Console

Double click on Access Protection on VirusScan Console - On Access Protection tab
Go to Anti-Virus Standard Protection - On right hand side, double click on Prevent mass mailing
worms from sending mail
On process to exclude tab, add PowerShell.exe at the end

Click ok
Thursday, April 10, 2014
SID history using PowerShell command
 This
is not the SID of ice age it regards to the security identifier of an
object located in Active Directory. The user account SID can be
extracted using the PowerShell cmdlet and modified them easily.
This
is not the SID of ice age it regards to the security identifier of an
object located in Active Directory. The user account SID can be
extracted using the PowerShell cmdlet and modified them easily. 
To find the properties of user with SID history detail
Get-ADUser "Mail.COM/Region/Asia/Rajis" –properties sidhistory
To search user on specific OU or domain
Get-ADUser -fILTER {nAME -eq "Rajis"} -SearchBase "OU=Asia,OU=Region,DC=MAIL,DC=COM" –properties sidhistory
To remove SID history value as
Get-ADUser -fILTER {nAME -eq "Rajis"} -SearchBase "OU=Asia,OU=Region,DC=MAIL,DC=COM" –properties sidhistory | foreach {Set-ADUser $_ -remove @{sidhistory=$_.sidhistory.value}}
Wednesday, April 9, 2014
Extracting the specific content line from huge log file using PowerShell command
Sometimes it will so be difficult to
search a line which it has the specific word or content using Ctrl+F in
the huge log file. Found out a easiest way that will very much useful
for our daily task
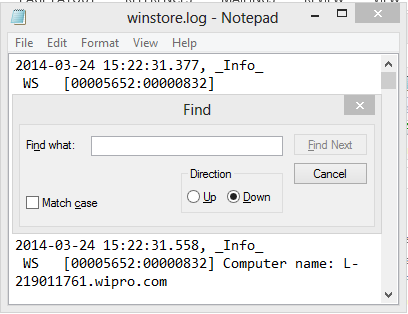
PS C:\Temp> dir .\Winstore.LOG | Select-String "Build"

If you want to search in multiple file
PS C:\Temp> dir .\Winsto*.LOG | Select-String "Build"
If you want to export the output to text file
PS C:\Temp> dir .\Winsto*.LOG | Select-String "Build" > Output.txt

Note: You can’t get output if you used Export-CSV cmdlet & this search can be done only notepad format files
Tuesday, April 8, 2014
Basic Troubleshooting Analysis using Task Manager & Resource Monitor
We know the task manager can help to
know the detail of service, processor and memory utilization but it has
capability to perform more than that…
Opening new task when everything got hanged in our system.
- Press Ctrl+Alt+Del – Click TaskManager
- Goto Task Manager – File – Run New Task

- Enter the name of the task you need to open

To identify and kill specific service for the application
Sometime
we have opened serveral application for the same service and need to
get killed specific application. For example let us open multiple
notepad file which points the same service notepad.exe
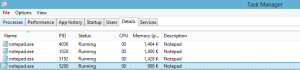
In
case if you want to kill specific notepad file you need to identity the
service name that should be killed. By default it just show notepad.exe
without much detail. To make it more detail right click – Select
Columns

In the Select Column – Select Command line – Click OK
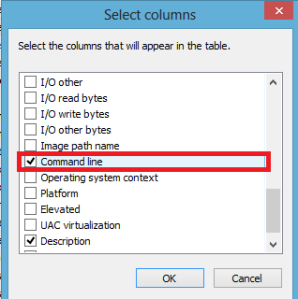
Now you can able to identify the notepad.exe service that is mapped respective notepad file

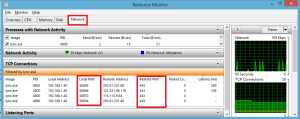
Identifying the port number and protocol used by application
Go to Task Manager – Click Performance Tab – Click Resource Monitor

Select the process the need to be monitored.
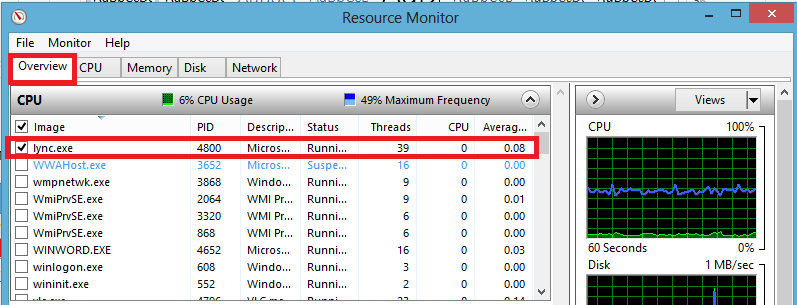
Go to the network tab where you can able to see the local port and remote port of the application used
Thursday, April 3, 2014
Microsoft SQL Server 2014 Ebook
A basic technical guide of Microsoft SQL Server 2014 was released for free of cost.

You can download the copy from the below url
http://blogs.msdn.com/b/microsoft_press/archive/2014/04/02/free-ebook-introducing-microsoft-sql-server-2014.aspx
You can download the copy from the below url
http://blogs.msdn.com/b/microsoft_press/archive/2014/04/02/free-ebook-introducing-microsoft-sql-server-2014.aspx
Wednesday, April 2, 2014
Microsoft SQL Server 2014
Microsoft has launched SQL server 2014 you can download them from the below site
http://technet.microsoft.com/en-US/evalcenter/dn205290.aspx
New features in SQL Server - http://msdn.microsoft.com/en-us/library/bb500435%28v=sql.120%29.aspx
SQL Server 2014 Product Guide - http://www.microsoft.com/en-in/download/details.aspx?id=39269
Microsoft SQL Server 2014 Logo

http://technet.microsoft.com/en-US/evalcenter/dn205290.aspx

SQL Server 2014 Product Guide - http://www.microsoft.com/en-in/download/details.aspx?id=39269
Microsoft SQL Server 2014 Logo

Sunday, March 30, 2014
Exchange Server 2013 Role Based Access Control – Mailbox Migration
There are 85 Management Roles and 11 default role group in
Exchange Server 2013 SP1 which is listed the end of the article. To list the management roles and role group use the
following commands respectively
- Get-ManagementRole
- Get-RoleGroup
There is a requirement where we need to provide access only
for executing mailbox migration or mailbox movement for an engineer. The engineer
should not have any other access.
Tried to find the roles which hold PowerShell command (i.e
New-MoveRequest. Found it is under the role Move Mailboxes, Migration. This will help you to search the PowerShell command where it is in the role.
After finding it out follow the below steps
- Create new role group with adding the roles on it
- New-RoleGroup Ex2013Migration -Roles 'Move Mailboxes',Migration
- Add the user to the role that you have created
- Add-RoleGroupMember ‘Ex2013Migration’ –Member User1
- If you want to additional users to the role group.
- Update-RoleGroupMember ‘Ex2013Migration’ –Members User2,User3 –Confirm:$false
- To verify the user list
- Get-RoleGroupMember Ex2013Migration
- Verifying the Exchange 2013 RBAC in EAC

Attached
the PDF file which holds the complete PowerShell command with respect to the role.
Exchange 2013 RBAC Default Management Roles
- Organization Management
- Recipient Management
- View-Only Organization Management
- Public Folder Management
- UM Management
- Help Desk
- Records Management
- Discovery Management
- Server Management
- Delegated Setup
- Hygiene Management
| Recipient Policies | Move Mailboxes | MyBaseOptions |
| Active Directory Permissions | Organization Client Access | MyContactInformation |
| Address Lists | Organization Configuration | MyProfileInformation |
| Audit Logs | Organization Transport Settings | MyRetentionPolicies |
| Cmdlet Extension Agents | POP3 And IMAP4 Protocols | MyTextMessaging |
| Database Availability Groups | Public Folders | MyVoiceMail |
| Database Copies | Receive Connectors | MyDiagnostics |
| Databases | Remote and Accepted Domains | MyDistributionGroupMembership |
| Disaster Recovery | Retention Management | MyDistributionGroups |
| Distribution Groups | Role Management | MyTeamMailboxes |
| E-Mail Address Policies | Security Group Creation and Membership | Org Custom Apps |
| Edge Subscriptions | Send Connectors | Org Marketplace Apps |
| Exchange Connectors | Support Diagnostics | Team Mailboxes |
| Exchange Server Certificates | Transport Agents | UnScoped Role Management |
| Exchange Servers | Transport Hygiene | View-Only Audit Logs |
| Exchange Virtual Directories | Transport Queues | WorkloadManagement |
| Federated Sharing | Transport Rules | ArchiveApplication |
| Information Rights Management | UM Mailboxes | LegalHoldApplication |
| Journaling | UM Prompts | MailboxSearchApplication |
| Legal Hold | Unified Messaging | OfficeExtensionApplication |
| Mail Enabled Public Folders | User Options | TeamMailboxLifecycleApplication |
| Mail Recipient Creation | View-Only Configuration | UserApplication |
| Mail Recipients | View-Only Recipients | MyAddressInformation |
| Mail Tips | ApplicationImpersonation | MyDisplayName |
| Mailbox Search | Data Loss Prevention | MyMobileInformation |
| Message Tracking | Mailbox Import Export | MyName |
| Migration | My Custom Apps | MyPersonalInformation |
| Monitoring | My Marketplace Apps | ExchangeCrossServiceIntegration |
| Reset Password | ||
Subscribe to:
Posts (Atom)